OVERVIEW
An essential part to the Billing system in WorkSpace is collecting payments for the services you have provided to your clients. Even though we don’t actually process the payments within WorkSpace, tracking the amounts to reflect on the client balance remains an integral piece.
USER GUIDE
To track a client payment in WorkSpace, navigate to the Billing tab, and click on the Payments button. Use the + (plus) button in the toolbar to generate a new payment. For this guide, click on the option that reads Create New Payment. Please note a lot of firms will wait until the end of the day, or until they are going to create a deposit slip to plug their payments into WorkSpace as the system can generate a deposit slip if applicable.
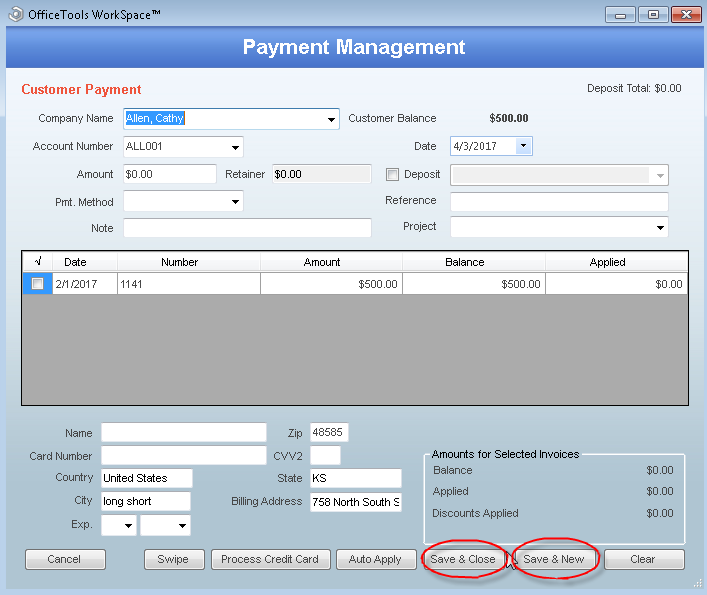
Once the Payment Management screen opens begin populating the payment details. Choose the client name or the account number, the amount that you’ve collected with this payment, the payment method (credit, debit, check, cash, etc.), and any notes that you deem important. On the right hand side you want to make sure that you key in the correct payment date. If the payment was a check you can use the reference field to key in the check number. While plugging in a project is inconsequential and holds no value, you can key it in for visible reference.
At the bottom part of the screen in the gray box you will see all unpaid invoices that exist for the selected client. You can choose how the payment is applied manually by selecting the box on the left. Please note payments will auto apply based on exact dollar amounts and then oldest to newest. For example if there is a payment made for $100.00 and there is an invoice for $100.00 it will auto apply to that invoice. If there are multiple matches or no matches at all, the payment will be applied to the oldest invoice first and upwards until it fully applied, or all invoices are paid. Please note that any unapplied payment amount will be automatically sent to retainer status.
If there are additional payments to be tracked click on the option that says Save and New and follow the above process again. If there are no additional payments to track, click on Save and Close to exit and solidify your payments.
RELATED GUIDES
- Introduction to Billing
- Creating Deposit Slips
- Previous Balance & Current Payments
- Value Billing
- Recurring Billing
- Progress Billing
- Auto Applying Payments
- Credit Memos
- Debit Memos