OVERVIEW
Use Reoccurring Invoices to set up periodic, flat rate billings for your client. If you are tracking time for the client, WorkSpace allows you to set up a rule to automatically include WIP and add expenses. When invoices become due for creation, WorkSpace will remind you and walk you through the process.
USER GUIDE
To begin using Reoccurring Invoices, you will need to go to the Billing tab > Invoices section and click on the Reoccurring button in the toolbar.

This will take you to the Reoccurring Invoices screen where you will see all existing invoice rules.
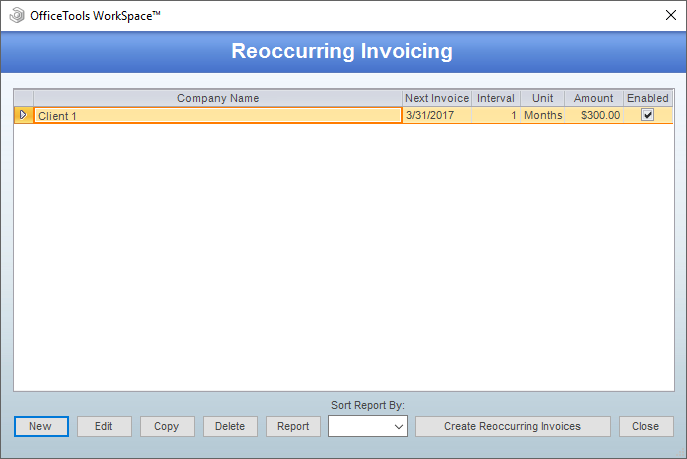
Here, you will be able to review which invoices are enabled and when they will run next. You can quickly enable or disable them from this screen or edit them to manage their details.

Whether editing an existing rule or creating a new one, you will be presented with the same options. If you are creating a new rule, keep in mind that the Contact will default to the currently selected contact. However, this can be changed at any time.
Your Invoice Type and Level of Detail can be configured here, which will work independently of the client and company defaults. However, because this is a flat rate invoice, most firms will use the Summary Invoice Type to keep the invoice to one line item. If you choose another type of invoice, such as Work Code, keep in mind that line item dollar amounts may look irregular because all line items will be apportioned to the invoice total.
Invoice Status is typically set to Final, but Review or In Process can be used if this invoice will need additional work before it is finalized and sent to the client.
The Summary Invoice Description is a required field, but it will only display in the line item description if the Summary Invoice Type is selected. If you have periodic invoices which need the period in the description of the invoice, use the Insert Merge Field option to include a merge field in your description with the appropriate period.
To control when the invoice will be created and how often, we will need to configure the Starting Date, Next Invoice Date, and Time to next invoice. Note that when you first create a new rule, selecting a Starting Date will automatically populate the Next Invoice Date. The Reoccurring Invoicing tool will look at the time frame from the Starting Date and Next Invoice Date to determine the WIP that should be included on the initial invoice. After the first invoice has been created, the Starting Date will be locked. The rule will now only look backwards from the Next Invoice Date based on the amount in Time to next invoice. In the example above, the beginning invoice will most likely not include any WIP since the Starting Date and Next Invoice Date are the same. However, the second invoice will relieve all WIP from April 31st backwards using the “Time to next invoice” value. In this case, that would translate into March 31st through April 30th.
The Amount of Each Invoice will be the flat rate value of the invoice. This does not include expenses that are created in this rule and additional WIP that is included as additional line items.
If this invoice is for a limited engagement, you can set up the rule to only run a certain number of invoices in Number of Invoices to Create. However, regular services can be configured to run indefinitely by entering a large value here, e.g. “99999.”
If you have an additional charge which should not be associated to the flat rate amount and isn’t time related, you can use Auto Add Expense Items to Invoice. First, check off the main option. All expenses are related to time cards, so you will then need to pick the work code which should be used for the time card. Note that this time card will not have any hours associated to it. Then, click Add next to the Expense Items list to designate the expense that should be added to the invoice.
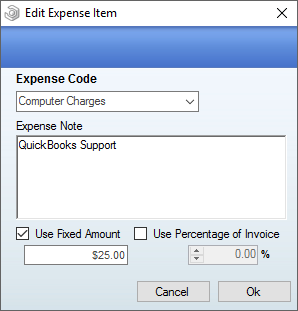
Select an Expense Code to associate this charge to. An Expense Note is required to save the expense item and should describe the charge. If this is a flat charge, choose the Use Fixed Amount option. If this is charge is related to the amount you are charging for the invoice, you can choose the Use Percentage of Invoice option instead. Once this is saved, the expense will automatically be added to any invoices created by this rule.
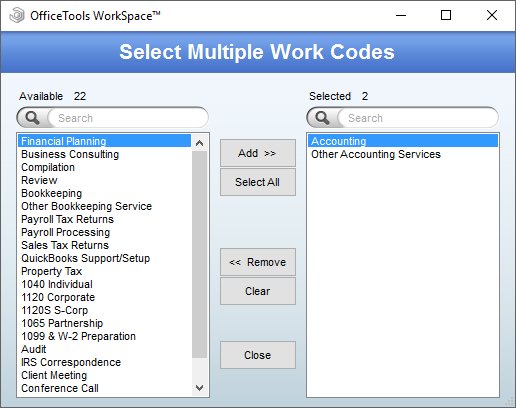
To automatically relieve WIP on this invoice, enable the Include following WIP as part of Flat Rate Amount option. You can then specify which work codes or projects to look for when assigning WIP to the invoice. Keep in mind that the best practice is to use work codes rather than projects because the projects are period specific. Once the project rolls over, this rule will not automatically switch to the next project. You can choose one work code by selecting it from the menu below, or by clicking the ellipsis button to select multiple work codes.
Simply add any work codes which should be considered part of the flat rate amount and any WIP with the specified work codes will be relieved when the invoice is created.
If Include remaining WIP as additional line items has been enabled, this invoice will also include WIP which was not specified in the previous option. But, it will be assigned to the invoice in addition to the flat rate amount and at its original value. It is very rare that this option will be enabled because items such as tax returns may be in process when the monthly invoices are created. It is mostly used for clients which are only billed on a monthly basis and are charged for out of scope work in addition to their flat rate.
Once your rule is configured, WorkSpace will begin notifying you whenever the invoice is due to be created. Any user with full access to Invoices will receive a notification on login that invoices are due to be created. The user can click “Yes” on this prompt or wait until later and click “Create” in the Reoccurring Invoices screen to reach the Create Reoccurring Invoices screen.
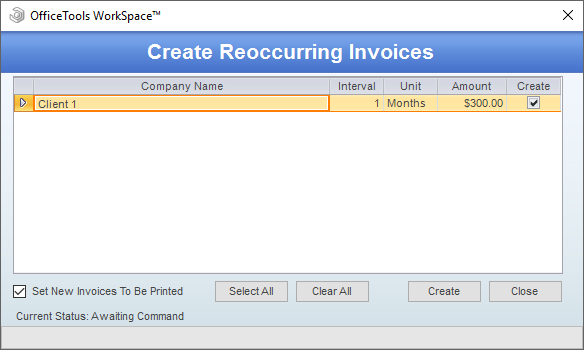
You will have the opportunity to choose invoices which should or shouldn’t be created at this point. Note that there is also an option to Set New Invoices To Be Printed in the bottom left corner of this screen. Click the Create button to process these invoices. All invoices in this batch will be created with the settings specified for each client.
RELATED GUIDES
- Introduction to Billing
- Value Billing
- Progress Billing
- Project Invoicing
- WIP Billing
- Bill To Contacts
- How to Track Time
- How to Assign WIP to an Existing Invoice
- Tracking a Client Payment