OVERVIEW
The most important things in regard to projects is making sure they are helping the staff track their work, the management team track the firm’s workload, and the firm relay that to the client. In order for any of these to happen the project will need to be moved through the steps that have been assigned to it.
USER GUIDE
When a project comes in the door and you are ready to start working on it the first step is going to be navigating to the specific client, and then to the Projects tab. Once you have found the desired project, the very first thing that needs to happen is the Assign Work button in the toolbar should be clicked and the first assignment should be created.
![]()
The Create New Assignment window will come up. Now, this screen will come up whenever an assignment is completed and the next assignment is being created, not just when Assign Work is clicked. The Assigned date and Due Date fields are the dates that are going to be associated to this particular assignment, and not the project as a whole.
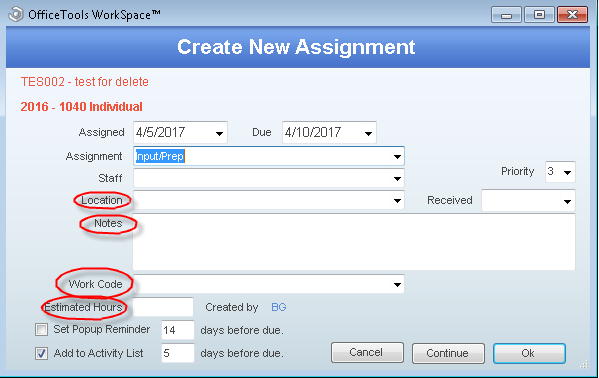
DO NOT emulate the project’s due date here as the assignment due date signifies how long the staff member will have to work on this particular step. The assigned date should be the date that you would like this assignment to show on the Activity List of the selected staff. In most cases the assigned date will remain as the day you are actually assigning it. The assignment should automatically populate based on your assignment group but can be changed to any assignment in the predesignated group. Next, choose the staff member you would like to assign to this step. Location, Notes, and Work Code are optional, but can be populated to streamline processes in the future.
Location can be used to help identify where the physical client file may be sitting, or where a meeting may be taking place. Work Code, if populated, will default the work code into all time cards generated in correlation to this project. The Estimated Hrs field allows you the ability to budget hours for the particular step. If you already budgeted the project as a whole, please note this will OVERRIDE the existing budget. The reminders section should not be changed as it is driven globally.
Once all of this information has been populated into this window, click Ok. The assignment should appear on the given staff’s activity list immediately. They now know there is something assigned to them as it shows on their Activity List with the client’s name, the project title, the specific assignment they are assigned to and the due date of that assignment. Their budget if applicable will show on the far right hand side of the Activity List item.
As that staff member works on and completes their task, they will use the checkbox on the left hand side of the Activity List item to signify that it has been completed. As they do that, based on various settings, a time card may pop up and allow them to track their time, but most importantly the Create New Assignment window will come up again. The above process should be copied and the next assignment should be assigned. In the assignment field the step that follows the completed assignment in your assignment group will automatically fill in, so your staff is not trying to guess what the next step is. All the staff should have to do is choose the person they assigning the next step to. If, for whatever reason, they aren’t sure, they can always assign it to the Project Manager who can then reassign the task to the appropriate person. This process will be repeated through all required steps to completion.
Please note that assignments can be reused and repeated as many times as necessary. Once the project is completed, navigate to the Projects tab and find the desired project. On the far right hand side under the due dates section there is a Completed checkbox that allows you to complete the whole project. Once that box is checked, the reoccur rules that are set for this specific project definition will go into effect and will either kill the project, ask if you would like to roll it forward, or automatically roll it over. The process will then begin again when the work comes back in on the next interval.
RELATED GUIDES
- Creating a Project Definition
- What is an Assignment?
- Creating an Assignment
- Missing Information Setup
- Project Manage Button
- Introduction to Projects
- Creating Projects for Clients
- What is a Project?
FREQUENTLY ASKED QUESTIONS
- What is the difference between Projects and To-Do’s?
- What should I do with work not yet ready to be started?
- Is it necessary to use the Budgeting options on the Project tab?
- On the Projects tab, what is the difference between the Cost and the Fee?
- On the Projects tab, what is the difference between the Project Manager and the Project Lead?