OVERVIEW
A Project’s due date calculation, assignment, billing, and checklist options are all based off of its Project Definition. This guide will cover how to create a new Project type or change an existing one.
USER GUIDE
To access the Project Definitions, go to Setup > Projects > Project Definitions. All of your active Project Definitions will be listed here.

Click Add to create a new Project Definition. The Project Definition screen will default to the first tab, Project Options.
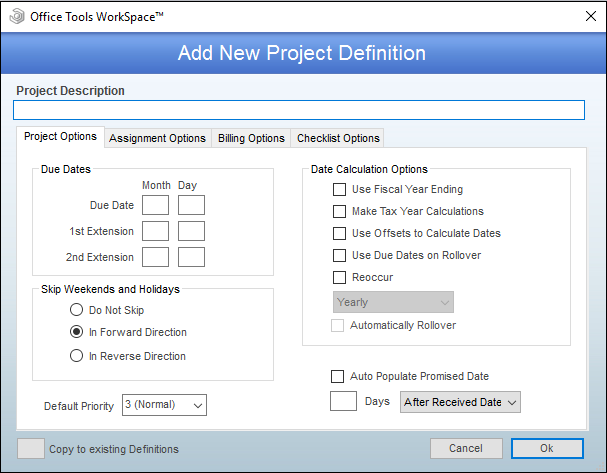
First, enter the name of your project in the Project Description. This is what will show up on any project reports.
Next, enter your project’s Due Dates. If its due date is calendar based, your values will be calendar months and days. If it is related to a fiscal year end, then it is whole months and days. For instance, a 1040’s due month would be “4” for April and its due day would be “15”. On the other hand, an 1120 is based on a fiscal year end. Its due month will be based on whole months after the year end, so that will only be a “2” versus a “3” for March. If you leave the due dates blank, the project’s due date will be the day that you create the project.
When you have entered Due Dates, you will need to set up your Date Calculation Options:
Use Fiscal Year Ending – This will also need “Use Offsets to Calculate Dates” turned on in order to properly calculate.
Make Tax Year Calculations – Use this option for any tax projects. When you set up a project for the previous tax year, it will calculate a due date with the next year.
Use Offsets to Calculate Due Dates – The Due Dates fields will turn into Due Date Offsets. Any numbers entered in these fields will now be considered full months and days instead of calendar months and days.
Use Due Dates on Rollover – When a project is set to rollover, the due dates of the new project will be pulled from this definition if this option is enabled. If it is not enabled, the due dates will be pulled from the project’s previous period. This option should be disabled for any project which could have a varying due date based on client, such as payroll processing. This option should be enabled on any projects with a federal due date, such as tax returns.
Reoccur – When a project is completed, you will receive a prompt asking if you would like to track the project again. This will rollover the project based on the period specified below this option. Note that if any period other than Yearly is selected, the extension due dates will be disabled. If this option is disabled, Automatically Rollover will be disabled as well.
Automatically Rollover – When a project is completed, it will not prompt the user to track the project again. Instead, it will rollover based on the period specified above this option.
Next, consider whether or not this project will skip Weekends and Holidays. If it will, specify whether it is forward or reverse. For most projects such as tax returns, it will skip “In Forward Direction.” For projects such as payroll processing, it should skip “In Reverse Direction.”
For projects dependent on clients providing their information, it is important to enable “Auto Populate Promised Date.” Set the number of days to reflect your performance target and select the “After Received Date” option. Keep in mind that this is only an automatic population of the date. You will be able to adjust it after it has been received.
The next tab is Assignment Options, which will control how your project handles assignments.
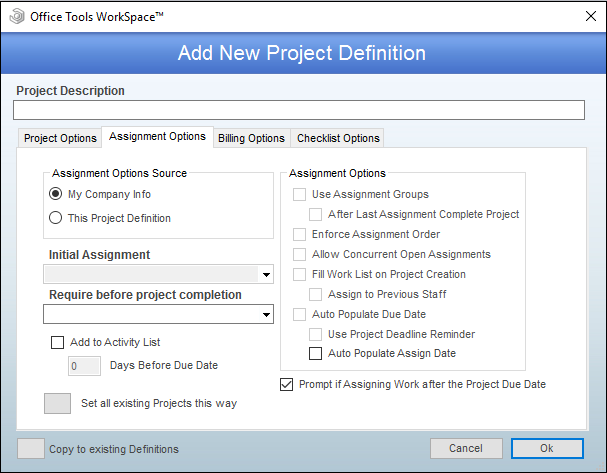
Assignment Options Source – If this project will follow the global rules, select “My Company Info” as the Assignment Options Source. If any of the information on this tab will vary from the global settings, use “This Project Definition” instead.
Initial Assignment – If this project is not set to “Automatically Rollover,” you can set up an “Initial Assignment” to be selected at the time you create the project for a client. This assignment will still require a staff member, assigned date, and due date.
Require before project completion – To ensure that a certain assignment has been completed before the project is completed, select that assignment here.
Add to Activity List – If this option is enabled, assignments will automatically populate with an Assigned Date of today and a Due Date of “x” days after today.
Assignment Options – This section will control how the project’s assignments will behave.
Use Assignment Groups – Restricts this project to the list of assignments designated in Project Assignment Group. This should be enabled for most projects. If this option is disabled, all of the other Assignment Options will be disabled as well. The project will have access to all of the assignments in your database without any specific order.
After Last Assignment Complete Project – Completes the project automatically after the last assignment on the Project Assignment Group is completed
Enforce Assignment Order – Restricts the order of assignments to exactly what is specified in this project’s Assignment Group
Allow Concurrent Open Assignments – Allows multiple assignments to be open at the same time. When this option is enabled and another assignment is created, you will still receive a notification that there is another open assignment. If this option is not enabled, Fill Work List on Project Creation will be disabled.
Fill Work List on Project Creation – When this project is created for a client, every assignment from this project’s Assignment Group will be added to the project’s Work List. If a Project Lead is specified when the project is created, they will be the initial staff member on the assignment. If there is no Project Lead, the Project Manager will be the initial staff member instead. These assignments will not actually be assigned to staff members if the Auto Populate Due Date options are not enabled.
Assign to Previous Staff – Previously assigned staff will receive the same assignments from the previous period. This will only work with projects which are set to reoccur.
Auto Populate Due Date – If Use Project Deadline Reminder is not enabled, this will populate all of the assignments’ due dates with the project’s due date. Use Project Deadline Reminder will be disabled if this option is disabled.
Use Project Deadline Reminder – Assignment due dates will be created based on when the project will add to the project manager’s activity list. If the project’s setting is 14 days, the assignments will be created with a due date of 14 days prior to the project’s due date.
Auto Populate Assign Date – Creates an assigned date “x” days prior to the assignments’ due date based on the Add to Activity List value.
Prompt if Assigning Work after the Project Due Date – When you create an assignment which is due after the project’s due date, you will receive a notification warning you of this. You will still be able to assign the work.
To configure the project options related to billing, proceed to the Billing Options tab.
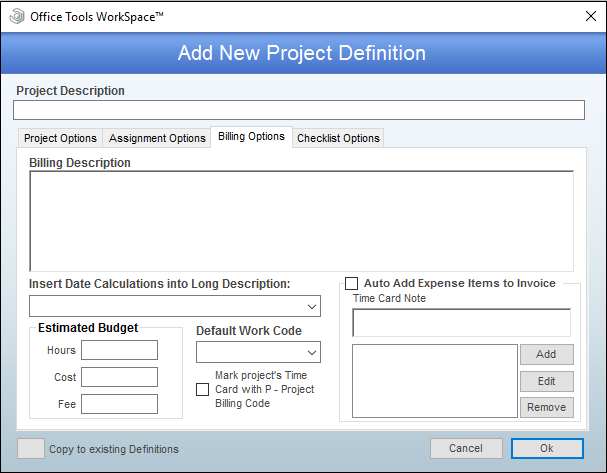
Billing Description – This is the default description which will populate an invoice when you create a Project Type invoice. You can add merge fields for dates to this description by selecting a value from the “Insert Date Calculations into Long Description” combobox.
Estimated Budget – These are the default values which will populate any new projects. This is a manual entry and not based on any assignment detail.
Default Work Code – Any time recorded to this project will automatically populate with the work code specified here.
Mark project’s Time Card with P – Project Billing Code – Marks all billable time generated from this project with a billing code of P. This assists in identifying project time when working on the Billing tab.
You can also build a checklist on the Checklist Options tab to create a default checklist for all projects created from this definition.

To build a checklist for your project, you will first need to add Checklist Items. To do this, click on the New button in the middle of this tab. This will open the Checklist Items window.
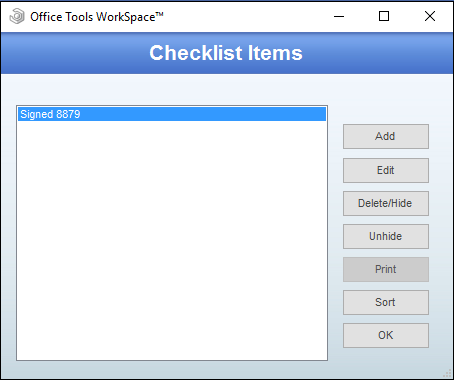
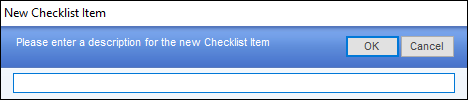
Add a new checklist item by clicking the Add button. Then, name your checklist item and click OK.
Once you have added your checklist item(s), click OK to return to the Checklist Options tab. Your new items will now show up in the Available Checklist Items field. These can be assigned to your project definition by clicking Add. If you need to reorder the list, use the arrows to the right of the Chosen Checklist Items field.
If you have already created projects based on this project definition, you can push this new checklist to open projects. Note that only projects without any existing checklist items will be modified.