OVERVIEW
This guide will show you the process to create a Project for one of your contacts. After all of your setup is done in Project Definitions and Project Assignment Groups you will still need to associate your Projects to your contacts to begin tracking the workflow and due date.
USER GUIDE
To create a project for a client you have a couple different options. If you are new to OfficeTools WorkSpace and just finished the setup of all of your project definitions and assignment groups, it may be most beneficial to use the multiple projects options. Navigate to the setup menu located at the top of the screen and click on Projects>Multiple Projects.
The Create Multiple Projects screen is laid out meticulously. The two fields in the upper left are filters that allow you to reduce the contacts that appear in the Available Contacts list. If you populate a staff’s name into the Account Manager field, your Available Contact List will filter down to the contacts assigned to the specified account manager. Same principal for the Entity Type field. If populated, available contacts will be filtered to your selection. Both fields will help when attempting to create a large number of projects for a select group of contacts. To select contacts to create projects for, simply add them to the right hand column labeled Selected Contacts.
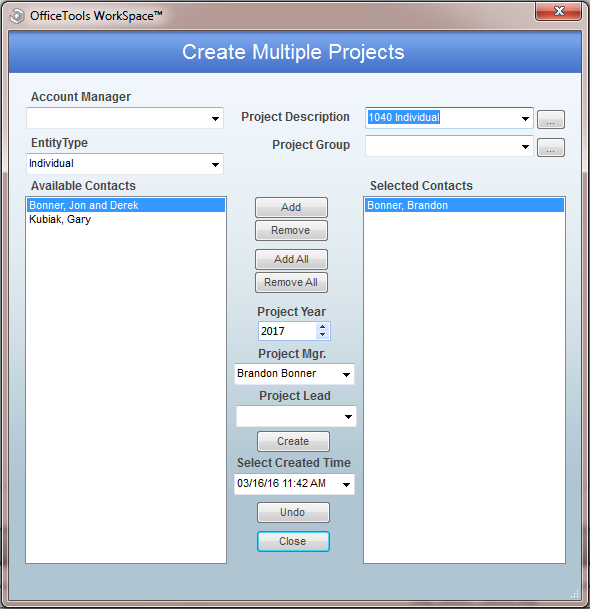
The selection of the project to be created should be fairly straightforward once you have selected the group of contacts that are desired. In the upper right hand corner, choose in the Project Description field the project that you would like to create for the selected clients. Now if applicable you can also use a project group. A Project Group allows you to create multiple projects at once for the same selected group of clients. Most commonly used for monthly services where there are 12 monthly projects that are tracked separately and you do not wish to assign them individually. To set up a project group, use the ellipsis button to the right of the field, and in true OfficeTools WorkSpace fashion, choose the group in the upper left hand corner and move the desired projects from the left to the right. Once completed, if used, all projects that were populated into the Project Group will be assigned to the selected list of contacts.
Whether you are using Project Groups or an individual Project Description, the middle column of fields will apply. Once you have chosen the desired list of contacts, and chosen a project description or project group, it is dire that you make sure the year, project manager, and project lead are populated in correctly before the creation of the projects. The year of the project defines the interval of the type of work. If you are working on a 1040 you would want the tax year populated. If you were working on bookkeeping or sales tax, the year would most likely be the current year. Each individual case will be different and needs to combed every time. The Project Manager and Project Lead fields apply to all contacts selected on the right. So if you would like to have different Project Managers or Leads for certain clients, adjust your Selected Contacts list accordingly. For reference, Project Managers are typically the staff members who are overseeing the completion of the project, not necessarily the staff members who will be working on it. All due date and budget alerts are typically routed to the Project Manager. Project Lead is not very commonly used as all it really provides is a filter on reports. Most of time the managing partner will be the Project Lead so they can run reports for the clients specific to them without having to see alerts for them on their Activity List. Disregard the field labeled Select Created Time.
Once all appropriate information has been filled in, click on the Create button and all projects will be generated at that time.
If you just want to create a single project for a single client, you will navigate directly to that client in the contact list on the left hand side of OfficeTools WorkSpace. Next choose the Projects tab along the top of the screen. Once in this view, choose the plus sign in the toolbar to generate a new project for the contact selected. Firstly, project related information is required. On the Project Details tab, the desired project will be chosen in the Type field, along with the project year, project manager, project lead. If the due date needs to be updated, you will find the fields on the right. The Work Code field allows you to set a default work code that will apply whenever time is tracked against this project. The Alias is a field that allows for project specific customization. Using the alias will pull in details to the end of the project type. For example, if you tracking multiple 1040 tax returns for a single entity, parents and kids, you can use the alias field to identify which 1040 belongs to who. In the title of the project the alias is attached to the end.
The reminders located in this window should be set by your Global Project Options, but can be updated if necessary. As a best practice, we recommend that you disregard the other three tabs in this window as most are set by global settings and are rarely changed. The Initial Assignment window allows you to create a precursor assignment before the actual workflow begins. Assignment Reminders tab controls when assignments are going to populate on the staff’s Activity List. Progress is where your alerts are set for the budgets. Yellow Alerts come first and Red Alerts second. These alerts help you keep up with progress on your budgets.
Once all information has been populated to your satisfaction, click OK and your project will be created and is ready to begin.
RELATED GUIDES
- Creating a Project Definition
- What is an Assignment?
- Creating an Assignment Group
- Missing Information Setup
- Project Manage Button
- Moving a Project through it’s Workflow
- Project Invoicing
- What is a Project?
- Project Interface
FREQUENTLY ASKED QUESTIONS
- Should I setup my Payroll Processing as a Project or To-Do?
- What should I do with work not yet ready to be started?
- Is it necessary to use the Budgeting options on the Projects tab?
- On the Projects tab, what is the difference between Cost and Fee?
- On the Projects tab, what is the difference between a Project Lead and a Project Manager?