OVERVIEW
This user guide will cover the basic sync functions of WorkSpace. Our seamless integration allows the user to send and receive information directly to/from the client portal without ever leaving the WorkSpace program.
USER GUIDE
Syncing Contacts to Portal
Select the desired client from the contact list on the left side of the main window in WorkSpace. Make sure the contact has a current, valid email address before proceeding. This email address is where they will receive their temporary password and notifications.
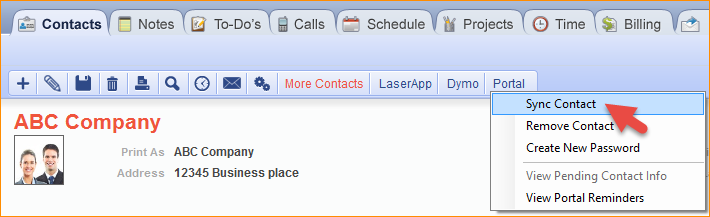
Once you have confirmed the client’s email, click the Portal button on the Contacts Tab and select “Sync Contact” from the dropdown menu.
A message will appear stating that “You have portal reminders ready to be sent,” and you will be able to view and send email reminders specifically or en masse. A portal reminder is an email to the new portal user with their temporary password and instructions on how to log on to the Portal website. If you select yes, another window will appear in which you confirm your selection—you will also have the option to preview the email being sent to your client. If you select No, you will be prompted again when you log out of WorkSpace.
After you send the reminder, your client will receive an email with a link to the portal website and their temporary password. Once they log on to the website, they will be prompted to create a permanent password.
Sending Files
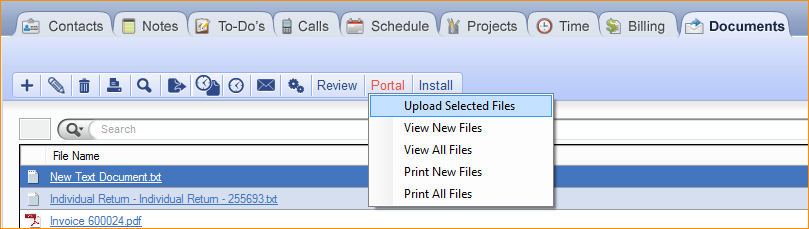
To send a file to a client that has been synced to the Portal, select the client from the contact list, go to the Documents Tab, select the desired file, and click Portal > Upload Selected Files. You can also right click on a file and select “Send to Client Portal” from the context menu.
This will bring up the File Transfer Queue, which will tell you the status of the upload and when it is completed. Upon completion, you will be prompted to send a reminder to your client letting them know that a new file has been uploaded to them. If you decline, you will be reminded when you logout of WorkSpace.
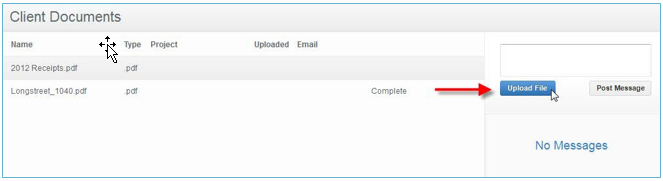
If you want to upload a file from your computer without adding it to the WorkSpace DMS first, click Portal > View Files. This will bring up the Client Documents window, on the right side of which there is an “Upload File” button. Clicking this button will allow you to browse for the desired file wherever it may be on your system.
Receiving Files
When a client sends you a file through the portal, it is easy to download it directly into WorkSpace. First, you will receive an email notifying you when one of your clients uploads a new file. Then, navigate to that client within WorkSpace, go to the Documents Tab, and click Portal > Check for New Files.
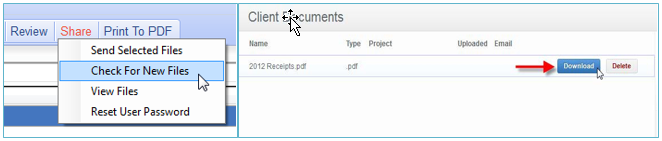
This will bring up the Client Documents window, displaying only files recently uploaded by the client. Click download, and the file will be downloaded directly into WorkSpace and appear in the appropriate clients document list.
Selecting “View Files” will give you a list of all the files associated to that particular client which are currently on the portal—both those uploaded by you and ones they have uploaded. All files can be downloaded or deleted from the portal through this window.
Files can be downloaded through the portal website by navigating to the desired file and clicking the download button that appears next to it when your cursor is over the file name.
Overview: This section reviews The WorkSpace Portal integration with Invoices and Payments within WorkSpace.
Invoices
To sync an invoice from with WorkSpace, go to the Billing Tab > Invoices view and highlight the desired invoice by clicking on it. Then click the Portal button and select “Upload Selected Invoice”
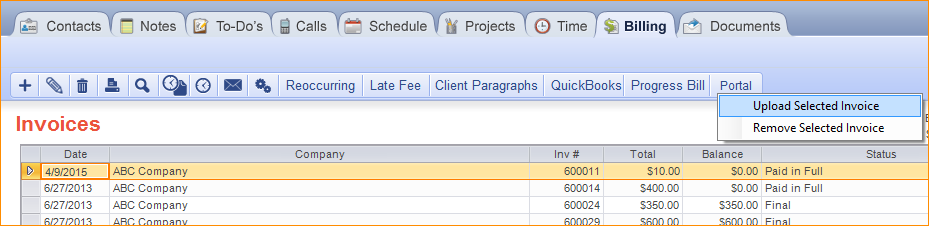
This will allow the end user (your client) to review it from the portal website. It will also allow them to pay the invoice if you have configured your portal to allow payments.
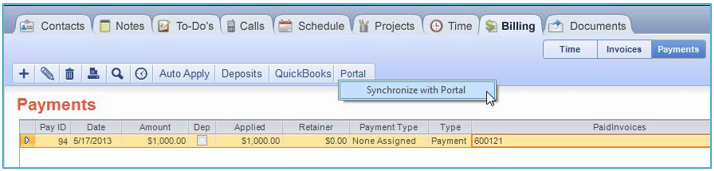
Payments
Payments sync to the portal in the same way that invoices do. Go to the Billing Tab, Payments view and highlight the desired invoice. Then, click the portal button and select “Upload to Portal.” This will allow the end user (your client) to review payments you have received from them.
RELATED GUIDES
- WorkSpace Online Billing
- Portal Document Transfer
- WorkSpace Online Initial Setup
- WorkSpace Online Settings
FREQUENTLY ASKED QUESTIONS
- Why are my staff receiving the message “Cannot validate client portal subscription” … when uploading documents to the Portal?
- Why is WorkSpace saying that I am not licensed to use the Portal?
- Why does the client portal show “This feature is coming soon”?
- Can I use Outlook to edit the email reminders generated from the Portal?
- Why is the Portal button grayed out?
- Why is WorkSpace freezing when I download a document from the Portal?
- Can I see how many clients are synced to the Portal?
- Is there a way to copy/download the document notes from the Portal?
- Is there any way to see the size of the files that are on the Portal?
- Can I send more than one document at a time through the Portal?
- Can I send a tax return to my client directly from WorkSpace?
- Issues with connecting to the Portal
- Why is WorkSpace crashing when I download a document from the Portal?
- How do I integrate the Portal with my website?
- Can I run a report to see all the email addresses in WorkSpace that are on the Portal?