OVERVIEW
WorkSpace is a single-screen interface broken down into three main areas: the contact list, main content screen, and the activity list. Each staff member logs in with their own personal username and password. When the staff member logs in, they will see the contact list on the left, the main screen controlled by the top tabs, and their own activity list which includes any task assigned to them.
USER GUIDE
How to navigate OfficeTools:
WorkSpace can be split into two sections: the staff portion and the contact portion. The top part of the screen, including the contact list and the main screen, is controlled by the contact you have selected and the tab you are on. If you click on ABC Company in the contact list (1), and navigate to the Contacts tab (2), ABC Company’s contact information will display.
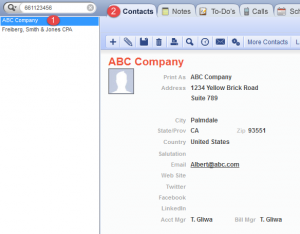
The contact list is populated from an initial import, but can be added to at any time. This list should include your entire contact database: prospects, vendors, clients, professionals, students… etc. To navigate to a contact, simply click in the search field at the top of the contact list, and start typing some data for the contact you are trying to find. You can search by phone number, email address, company name, first name, and last name.
For more information about importing contacts or contact integrations, see user guide on Contacts?
Navigating the Contact List:
If you click on the spyglass on the left-side of the contact list, you will see a drop down menu that can help you better search for a contact.
In this drop down menu you will see the options for Advanced Search. This option will allow you to search for a contact with further contact details, such as: city, state, entity type, zip code, profession, social security number, contact type, etc.
Also on the advanced search menu, you can see recently visited contacts, filter your list by excluding/including certain contact types or account managers, choose to display or sort the list by account number, and set the sensitivity when searching for a contact.
At the bottom of the contact list, you will see a List View and a Detail View. The List View will show a list of contacts with a contact summary at the bottom of the list. (Default view when first logging in). The contact summary box shows the main contact’s name, main phone number, email address, account number, account manager, billing manager, and a possible contact message. To add a red contact message, right-click on the blue pane and select Contact Message.
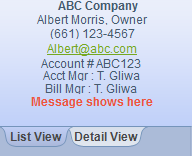
The Detail View removes the contact list and displays more detailed information of the contact selected, such as: address, alternate contacts, dependents, projects coming due, un-billed hours, etc.
Navigating the Main Tabs:
The main portion of the WorkSpace interface is populated based off of the tab that you have selected.
Contacts: Basic contact information for the main and alternate contacts of that selected entity.
Notes: Important information or permanent notes about the selected contact.
To-Do’s: One-off tasks that can be assigned to a staff member. They involve one task and one staff member and can be added to the staff’s activity list.
Calls: A record of anytime you have talked to the contact, whether they called or you called. A call can be assigned to only one staff member and added to the staff’s activity list.
Schedule: When on the Contact view, it can display any appointment that the selected contact has had or will have. When on Staff view, it displays the calendar for the staff member that is selected on the left in the Selected Staff menu.
Projects: A log of all the services we are taking care of for the client. The Projects tab is where workflow is assigned and tracked. Projects include multiple staff and multiple staff members.
Time: Where a staff member can manually track a time card. You can also see non-billable time cards tracked for the selected contact by changing to the “Contact” view in the top-right corner.
Billing: This tab is broken down into three portions- Billable time, Invoices, and Payments.
Documents: This manages the contacts documents. The Document Management System is non-proprietary and is just looking to a mapped drive and displays any documents in that mapped location.
Tool Bars within the tabs:
Each of these main tabs includes a tool bar where you can add, edit, delete, save, print, etc. Most of the tab’s toolbars look the same.
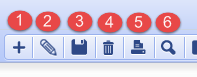 1) The plus + sign is to Add or create new. Add a new call, to-do, appointment…etc.
2) The pencil is to Edit the current item. Change the notes, change the results of a call…etc.
3) The floppy disc is to Save. Save the current changes or added text.
4) The trash can icon is to Delete the item.
5) The printer icon is to Print the current item.
6) The spyglass is to do an Advanced Search for the item.
Navigating the Activity List:
The bottom portion of the screen is related to the staff member and not a contact. When the staff member logs into to the software, they will see all the tasks that are assigned to them. These tasks in the list get populated from various areas in the software. Any staff member can create a task and assign it off to another staff or to themselves.
Just like the contact list, you can search for an item in the search bar. If you wanted to see only items for a 1040, type in 1040 in the search field. You can also do a negative search, so if you wanted to see everything except items related to a 1040, search with a (-) negative “-1040”. The activity list can be filtered by Focus, Priority, and Type of activity. You can also change the View and Sort to rearrange your activity list.