OVERVIEW
One of the many integrations offered in connection with OfficeTools WorkSpace is a connection with Lacerte Tax Software. The main thing to note is that the integration can only be linked to one year’s Lacerte files at one time.
USER GUIDE
The Lacerte Integration is a tool that provides a link between your WorkSpace and Lacerte databases. There are various functions to the Lacerte Integration that can be referenced in subsequent guides, but no matter what you want the Integration to do for you it needs to be configured first.
SETUP>MY COMPANY>INFORMATION & SETTINGS>INTEGRATIONS>LACERTE
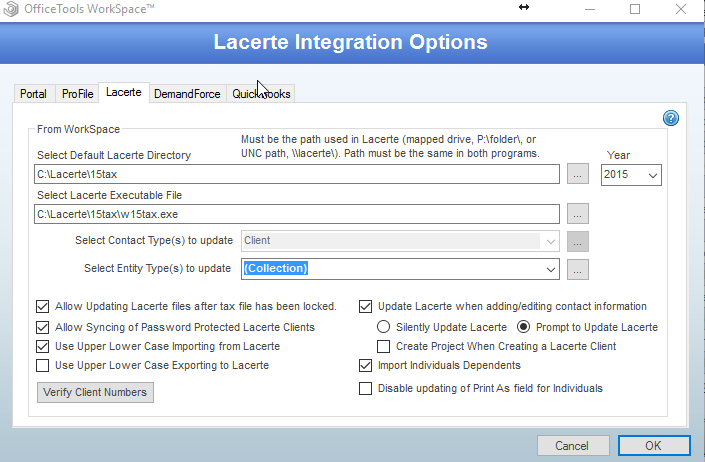
This brings you to the setup screen for the Lacerte Integration. First and foremost, we need you to point us to your Lacerte data files in the field labeled “Select Default Lacerte Directory”. This will be where your tax files are located i.e. your folders labeled idata, cdata, etc. Make sure to also choose the year that you are currently using in Lacerte.
The executable file is the file path for the application itself, thus 98% of the time it is going to be located on the C drive. Navigate to C:\Lacerte\ and then choose the appropriate tax folder. Scroll all the way to the bottom and choose the file that has a “w” in front of the year and ends in “.exe”
For example, if you were dealing with the year 2016 Lacerte tax, the file path for the executable would read like this C:\Lacerte\16tax\w16tax.exe
Please note that OfficeTools WorkSpace cannot be linked to more than one year tax file at a time. So, when you proforma’d your clients from one year to the next, the file path, year, and executable file will need to be changed along with it. Every year this will need to be updated.
The bottom half of the setup screen is more function related. “Select Entity Type(s) to update” allows you to map each individual entity’s mapped folder. If you click on the ellipsis button to the right of the field, you will see a screen that allows you to turn on and map each tax types Lacerte folder mapping. Select all desired entities that you would like to have synchronized between WorkSpace and Lacerte. In most cases, you are going to want to select all options. Unless you as a firm have manually changed where Lacerte saves certain tax files, the file paths that are shown are correct and should not be changed.
In some instances, certain firms may decide to password protect or lock tax files in Lacerte. If you are one of those offices, you have the capability of allowing WorkSpace access to those files even though they protected. The benefit of these settings is that it will keep all your tax files completely up to date so when you roll it over into next tax year, all the changes will be in place. These especially need to be checked when you go to do your first import. If you perform the import without these boxes selected, the integration will not be able to see the clients that may be locked or password protected.
The next two options control whether you use mixed case or upper case when importing/exporting to and from Lacerte. If you would like your Lacerte to remain in all Upper-Case letters no matter how they keyed into WorkSpace, then leave the bottom option unchecked. If you want Lacerte to export into WorkSpace in all Upper-Case, then leave the top option unchecked.
The option on the right-hand side of the screen that reads “Update Lacerte when adding/editing contact information” should be checked. This option is the whole purpose of the Lacerte Integration. By checking this box, you are allowing WorkSpace to communicate to Lacerte and push any contact data changes and additions to Lacerte, seamlessly. This will allow you to key in data one time and maintain both databases. In most cases, when you first start using WorkSpace, you are going to want to choose the option to Prompt to Update Lacerte. That way the person pushing the information knows. The other option to silently push information to Lacerte should only be turned on once you are comfortable with the sync.
When you are importing from Lacerte into WorkSpace you can have the Lacerte Integration trigger the creation of the corresponding tax return project automatically if you have the option checked off that says “Create Project When Creating a Lacerte Client”. This setting isn’t commonly used as we at OfficeTools advise against creating clients in Lacerte first. When importing from Lacerte you also have the ability import individual’s dependents from the dependents screen in Lacerte. Again, as we don’t recommend that you are importing from Lacerte this option is best left unchecked.
The last part of the Lacerte Integration Setup has to do with making sure your Lacerte data is imported or matched up to your OfficeTools WorkSpace database. We do recommend that you contact our training team for help with importing your Lacerte data into WorkSpace for the first time, but to access the screen go to CONTACTS>IMPORT/EXPORT CONTACTS>LACERTE SYNC>IMPORT/EXPORT and then choose the option that says “Import Lacerte” on the right-hand side. There are a few considerations to take before you bring the data in, especially when it comes to duplicates so keep that in mind.
If you already have a contact database in WorkSpace and are looking to link your Lacerte file up to the existing data, you can go to CONTACTS>IMPORT/EXPORT CONTACTS>LACERTE SYNC>MATCH CONTACTS. This will open a screen with your Contact list from WorkSpace and your contacts from Lacerte, and you need to match them by selecting the matching contacts on both sides and clicking on “Link” in the middle of the screen. This will create the bridge between the two programs and you can immediately start using WorkSpace to update the appropriate data and it will push to Lacerte based on your settings above.