VIDEO
OVERVIEW
Global Settings are only accessible by users with administrator rights. To access the global setup window, from the menu at the top of the program window go to Setup>My Company>Information & Settings.
The Contacts section of the global setup allows you to manage the various Contact related features, including changing the labels of the five Custom Fields on the Contacts tab, making Notes permanent, and automatically assign account numbers to all your contacts.
USER GUIDE
- The Contacts button located in the My Company Information and Settings section opens a window that provides first and foremost access to the Custom field labels. The custom fields are located on the Contacts tab in the middle column of information at the bottom. By default the label for those 5 fields will read as “Custom 1”, “Custom 2”, “Custom 3”, etc. Once you decide what information you want to store in any of those fields, you can change the name of that field in this section. Once changed, simply restart OfficeTools WorkSpace to solidify those changes.
- Another option located in the Contacts button is Account Number generation. Some firms may want to have OfficeTools WorkSpace generate account numbers for their contacts automatically using a specific combination of numeric and alpha characters. Clicking the button right under those settings pushes account numbers out to any contact that doesn’t already have an account number. Please be aware this will not override existing account numbers. If your firm wishes to manually assign account numbers, the field is located in the top right of the Contacts tab and can be input at any time and is limited to 9 characters. If you attempt to use an account number that is already in use, you will be prompted to choose another account number.
There is a large collection of miscellaneous options under the Other Settings heading in the Contacts section of the My Company Information & Settings. These settings will control various functions in relation to contacts.
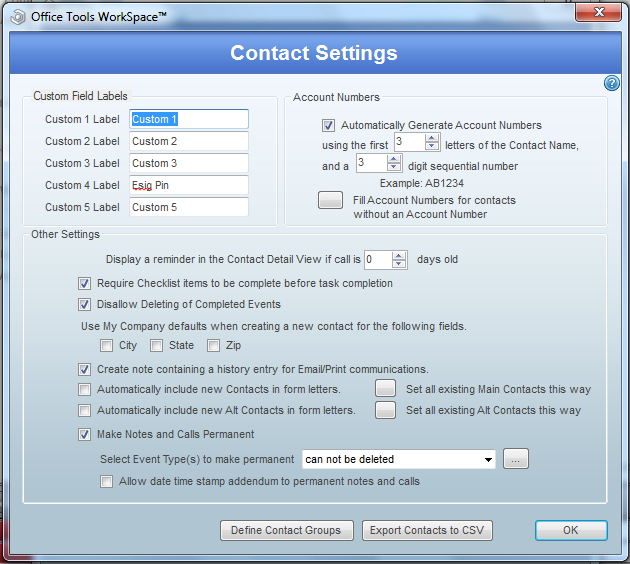
- The first option that you will see controls how phone calls show in the Detail Contact List view. On the left hand side of OfficeTools WorkSpace, right beneath the Contact List you will find two tabs labeled “List View” and “Detail View”. These tabs affect how the Contact List displays. List View tends to be the most used and is the default view because it displays all Contacts in your database in a list type view. The Detail View of the Contact List displays contact specific data with one being open calls. In order for a call to be displayed here the aforementioned setting needs to be set to add that call a specific number of days after it is due. If you would like open calls to display in this view 2 days after they are due, set the option to “2 days old”, if you would like your calls to show as soon as they are due set it to read “0 days old”. Negative numbers are not allowed in the setting.
- The next checkbox controls the requirements of checklist items and their completion. Throughout the OfficeTools WorkSpace system you will find a feature called Checklist which is a form that allows for items to be populated in to a list form for ease of tracking and organization. The setting found in the Contacts tab of the My Company Information and Settings sets the checklist as a required item to be completed before any task that the checklist is attached to can be completed. Checklists are always going to be associated to a task and in order for that task to be completed all checklist items must be checked off as completed. If checklists are being used this box is a good way to make sure that the checklist is being reviewed as it creates accountability for staff. Staff would have to check off every checklist item acknowledging that the completed any item in the checklist before they can complete the whole task.
- Disallow Deleting of Completed Events is direct and if checked means that any item that has been completed, from Calls and To-Do’s to Projects like 1040s and 1120s, can’t be permanently deleted from the system if they have been completed. This setting is highly recommended as creating records of tasks, correspondence, and appointments for all clients is the ultimate goal. Allowing tasks to be deleted after they have been completed could create gaps in the client file that is created. If a task needs to be deleted and it has been completed the option of uncompleting it is always a way to make sure only specific staff are deleting tasks.
- When creating new contacts in OfficeTools WorkSpace information can be set to populate into the city, state, and zip code fields automatically based off the information of your firm. If you want the state your office is located in to automatically fill in on any contact, check the box in the My Company Information & Settings that reads “State”, and the same for city and zip.
- Whenever you email/print something from the OfficeTools WorkSpace interface this setting will create the opportunity for you to track a note with that information in it. If an invoice is sent to the client for example, a prompt will pop up and allow you to track a note with that pertinent information to the contact that will be stored in the Notes tab.
- Within OfficeTools WorkSpace there is the capability to create standardized mailings that can be sent out in mass. These Form Letters are sent to any desired set of contacts. The options that read “Automatically include new Contacts in form letters.” and “Automatically include new Alt Contacts in form letters.” Allows you to specify on a global level which types of contacts are included by default into the potential form letter listing. Main contacts in OTW are the contacts that exist on the front page of the Contacts tab with all of the main information for a given entity. Alt or Alternate Contacts exist within the More Contacts button on the Contacts tab and can be any person other than the Main Contact. By selecting either of the aforementioned settings you are allowing any Main Contact and any Alt Contact to be included as options to send a form letter to. Best Practices would be to select the Main Contact and not the Alt Contacts as defaults, as most Alt Contacts wouldn’t need an additional letter with similar information. Please Note: even though the global option may not be selected you can still mark individual Alt Contacts to be included when you are creating them.
- Notes in OfficeTools WorkSpace are fairly straightforward. Information can be stored for a contact under the Notes tab indefinitely and can be updated and added to as needed throughout its lifespan. However in certain circumstances it may be important to lock that note down permanently and be immune from deletion or even edits. This option is not something that can be undone by any user. User rights do not override the permanency so please be aware of what you mark as permanent. To turn this setting on first check the box that reads “Make Notes Permanent” and read through the prompts as it reinforces the nature of the irreversible status notes will be in once marked permanent. You do need to have an Event Type created that you want to use as the permanent type. It is recommended to create a stand-alone Event Type called “Permanent” to use only for permanent notes. To create an Event Type go to SETUP>SCHEDULE>EVENT TYPES to create a new Event Type. The last option, “Allow date time stamp addendum to permanent notes”, allows for additions to be made to Notes using the time date stamp. What this means is you will be able to add to a note, without being able to change or delete what is already there.
- The Define Contact Groups button at the bottom of the My Company Information and Settings Contact screen, is one place that you can go to access your Contact Groups. Contact Groups round out our CRM functionality by allowing you to make custom, labeled groupings for clients and use those groupings when using things like Form Letters, or running Contact reports. The window that pops up when the button is selected allows you to add, edit, delete, and/or hide contact groups. Contact Groups can be managed as needed and continuously. Once you create a Contact Group you will then need to add the desired contacts to that group.
- OfficeTools WorkSpace understands the intermittent need to exports clients out of a database for new software implementation, mail merge, or various other tasks. To make things accessible we have allowed through the use of the Export Contacts to CSV button at the bottom of the My Company Information and Settings Contacts screen to choose what data you want to export out of OTW, and where you would like to save the file. Keep in mind this will be only contact related information like phone numbers and addresses, but can provide with a solid Excel document full of your client data.