OVERVIEW
When the Invoicing button is selected, the first tab at the top is “Options,” and a lot of the default invoice details and line items will be set here.
USER GUIDE
When looking at your global invoicing options there are a lot of ways to customize the look and function of your invoices. It is highly recommended that you utilize our training department to streamline the setup process.
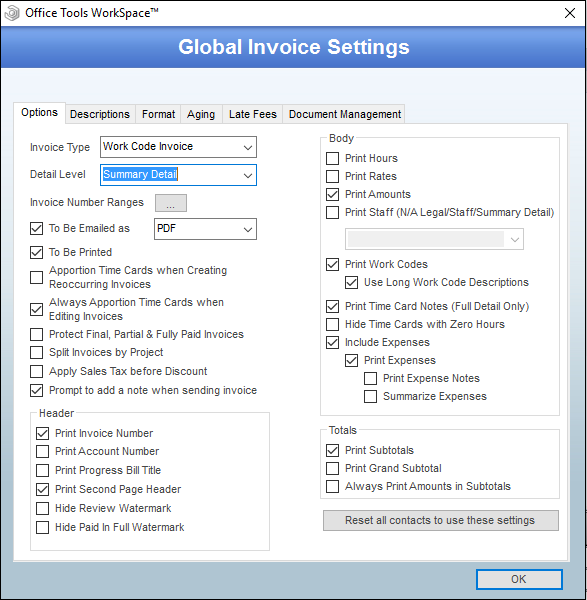
- Invoice Type – The first option asks what type of invoice your office would like to use by default. OfficeTools WorkSpace has 9 different Invoice types available, and these invoice types control how the line items show on your invoices. For example, a work code style invoice will display the line items based on the work codes used when the time was tracked. A Project style invoice will organize the line items based on the projects that the time was associated to.
- Detail Level – The Detail Level option allows you to include or exclude certain information from the invoice. There is Summary Detail, Partial Detail, and Full Detail. Summary Detail will always display the least information and effectively summarizes the line items chosen.
- Invoice Number Ranges – Invoice Number Ranges allows you to choose specific starting points for invoice numbers. OfficeTools WorkSpace recognizes that you probably came from another billing system and have an ending invoice number that you would like to keep sequential. When the ellipsis button is clicked, it opens a dialogue box where you can add invoice number ranges. If you just want to keep your invoices sequential based on your last used invoice number, simply click the “Add” button and in the Beginning Number column enter the desired starting number. An ending number is not needed. Lastly, click the “Selected” box to switch to the desired interval. The next invoice created will use the designated starting number.
- To Be Printed and To Be Emailed – OfficeTools WorkSpace has the ability to batch send invoices, both by printing and emailing. The following two options control whether invoices are marked to be included in the batch printing or batch emailing. “To Be Emailed as” and “To Be Printed” will allow an invoice to show up in the Batch Print window and/or the Batch Email window. All invoices can always be printed and/or emailed individually. These options specifically control access to the batch sending options.
- Apportion Time Cards when Creating Reoccurring Invoices – OfficeTools WorkSpace offers the capability of reoccurring invoicing, where a monthly invoice goes out to a client for a specific amount. Billable time will be automatically associated to the reoccurring invoice and the option that reads “Apportion Time Cards when Creating Reoccurring Invoices” controls what happens to that billable time. If the box is checked, time will be apportioned. This means that any write up or write down that occurred based on the invoice amount to the time amount will be proportionately allocated to all time cards. If the box is not checked, the allocation will not affect the time cards associated to the invoice. OfficeTools WorkSpace best practice states that this box be checked so you gain proper Utilization numbers down the line.
- Always Apportion Time Cards when Editing Invoices – This option is different from the above option because it applies to any non-reoccurring invoice. If this box is checked, when an invoice is created based on billable time and the invoice total is overridden, the adjustment (write up or write down) will automatically be proportionately applied across all time entries, keeping utilization true. If this box is left unchecked, when an invoice total is overridden, you will be prompted to apportion the time and have the option to apportion or not. If the adjustment is not apportioned no change will be made to the associated time.
- Protect Final, Partial, & Fully Paid Invoices – If this option is checked, it will not allow any changes to be made to an invoice if it is marked as Final, or if a payment is applied to it. Appropriate rights will allow a staff to remove it from Final status if changes are necessary. But, if this box is checked, the invoice will be locked down and immune from changes once it is marked as Final.
- Apply Sales Tax before Discount – For those offices that deal with sales tax, there is an option that controls when it is applied. An office that may need sales tax can either have it apply after a discount, or before. The idea here is which “invoice total” you want the tax to be calculated based on. Discounts simply lower the invoice total and therefore would generate less tax.
- Prompt to add a note when sending invoice – When sending an invoice via email, you have the ability to have a note populated into the Notes tab for the client through the option “Prompt to add a note when sending invoice.” The note will pop up as you are emailing the document and have date and time information along with some information about the attachment. Just click “OK,” and you will find that note in the Notes tab for that client.
Header – In the Setup>My Company>Information & Settings>Invoicing, you can control what prints in the header section of your invoices by selecting what information you would like to display in the boxes under the Header section.
- Print Invoice Number – This is the option to print the invoice number in the header. This is a very common option to be selected as it gives the client an identifying tag for their invoice to reference to you.
- Print Account Number – This option refers to the client’s account number in WorkSpace. This is an internal measure for each office and should only be turned on if you use account numbers to identify your clients more frequently than their File As name.
- Print Progress Bill Title – If you are associating invoices to our Progress Billing function, you can choose to have the Progress Bill name display on the individual invoice. Progress Bills in WorkSpace refers to a named collection of invoices that are applied to a total billing dollar amount.
- Print Second Page Header – This option will print the client’s name and page number in the upper left hand corner of any subsequent page after page 1.
- Hide Review Watermark and Hide Paid In Full Watermark – These options effectively control the same thing. When an invoice is in a status, it will display on the invoice so no invoice that wasn’t done, or previously paid, gets sent to the client. However, if you would like to hide the watermark that is printed on those invoices that are marked Review or Paid In Full, these settings allow you to do so.
Body – This section of the Global Invoice Settings window controls what type of details print on invoices by default. These settings can also be changed for any client, or even for any given invoice.
- Print Hours – This controls if hours show on invoices if billing WIP (Billable time). The hours will be based on time that has been tracked or any adjustments that have taken place.
- Print Rates – This option will allow the client to see the hourly rate they were charged at. This will display true rates unless otherwise adjusted on the invoice.
- Print Amounts – This is almost always checked as it allows line items to have totals. If this box was not checked, there would be no dollar amounts for line items, just an invoice total.
- Print Staff (N/A Legal/Staff/Summary Detail) – As stated in the name, this option does not affect the Legal invoice type, Staff invoice type, or any invoice that is in Summary Detail. The Legal and Staff invoice types by default already include staff information regardless of whether this box is checked. Summary detail on any invoice will exclude the staff information whether this box is checked or not. The drop down allows you to choose how the staff member’s information will display on the invoice; Just the Staff’s initials, First initial and whole last name, or complete name.
- Print Work Codes – When creating an invoice with line items that include time card related information like Project or Staff invoice types, work code related information can display. If work codes in WorkSpace are not easily understood by your clients and you do not want to display the work code information at all, the “Print Work Codes” can be unchecked so that the work code will not display at all. Invoice types like Summary, Work Code, Date, and Custom will not be affected because they either have to have the work code information or they wouldn’t have it either way.
- Use Long Work Code Descriptions – Use this option if you want to use a more detailed, client friendly description that may have been populated into the Long Work Code Description during the work code setup process. This is a description that can be tailored to specifically show up on invoices in conjunction with the work code name to explain services. This can only be enabled by also enabling the previous option, “Print Work Codes.”
- Print Time Card Notes (Full Detail Only) – When tracking time in WorkSpace, staff can populate notes describing what they were working on when they tracked that time card. If relevant, you can have that time card note populate automatically on the invoice when you choose Full Detail on any given invoice type. You can manually insert time card notes using the “Staff Notes” button above the line items on the invoice edit screen, but this setting automatically inserts them for Full Detail invoices.
- Hide Time Cards with Zero Hours – Expenses in OfficeTools WorkSpace have to be assigned to time entries that are assigned to the desired client. For many instances, a billable time entry will have been created for the time which was spent performing a task that the expense can be attached to. However, sometimes there was no time that was created, and a time entry is still required. In this case a time card with zero hours is created to track the expense. The option “Hide Time Cards with Zero Hours” will not display those time cards with zero hours on an invoice but will still display the expense that was tracked.
- Include Expenses – Expenses are an important part of any client billing. OfficeTools WorkSpace’s billing system has expense codes that help track expenses. When expenses are tracked and billed, they display in a line after the invoice total. The option that reads “Include Expenses” allows any tracked and billed expense to be included in the invoice total. If you do not have this box checked, expenses will not be included in the invoice amount and will not show anywhere on the invoice.
- Print Expenses – This option allows expenses to be printed on the invoice at the bottom of the invoice as a subsection on the invoice with all individual expenses and amounts shown separately and totaled before the invoice is totaled.
- Print Expense Notes – When an expense is tracked, the staff can populate a note that explains that expense and why it was charged. If you would like to display that note on the invoice, you can choose the option “Print Expense Notes.” The notes will display at the end of each expense description.
- Summarize Expenses – This option will take all associated expense items on a given invoice and display one total right before the invoice is totaled under the default description of “Expense / Mileage.” No expense details will be printed if this option is selected.
- Print Expenses – This option allows expenses to be printed on the invoice at the bottom of the invoice as a subsection on the invoice with all individual expenses and amounts shown separately and totaled before the invoice is totaled.
Totals – The Totals section in the Global Invoice Settings controls how dollar amounts are subtotaled on invoices.
- Print Subtotals – This will subtotal each line item on the invoice. An invoice total will follow.
- Print Grand Subtotal – This option will total all line items together prior to any sales tax, late fee, or discounts. An invoice total will follow.
- Always Print Amounts in Subtotals – If the option to “Print Amounts” has been turned off, you can turn on this option to still print subtotals. In the case of a Work Code type invoice, you may want to use Full Detail to list all of the time cards. But, you do not want to show the charges for each of those time cards while still displaying the subtotal for each work code. Disabling “Print Amounts” and enabling this option will achieve the desired effect.