IMPORTING WORK CODES FROM QUICKBOOKS
The Work Codes (or Service Items in QuickBooks) are the heart of your Time & Billing system. Without these items, you would not be able to do payroll or bill clients. So it is important that they are setup correctly.
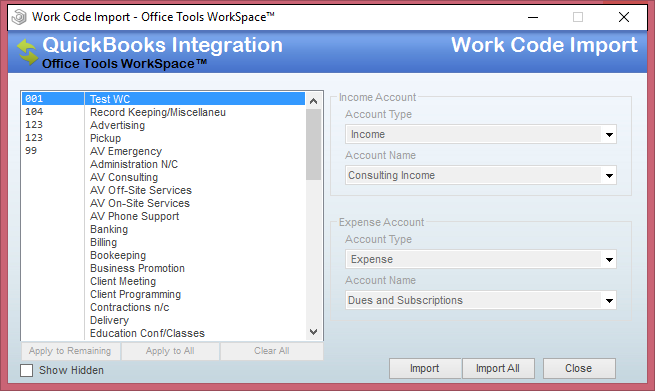 The Work Code Import allows you bring a Service Item from QuickBooks into WorkSpace as a Work Code that will bill out and pay staff in a manner identical to the original one in QuickBooks.
To Access the Work Code Import, in the menu bar in WorkSpace, click Setup -> QuickBooks -> Work Codes -> Import from QuickBooks.
The Import form consists of four main elements:
- The List of Service Items in QuickBooks
- The Income Account associated to the selected Service Item
- The Expense Account associated to the selected Service Item
- ‘Show Hidden’ filter and ‘Import’ buttons
The Income and Expense Accounts are on this form simply for reference, you cannot modify their values.
The Import has only one filter, ‘Show Hidden’, which determines whether or not the list shows items that are ‘Inactive’ in QuickBooks.
You can Import items one at a time by selecting them in the list and clicking ‘Import’, or you can Import them all at once by clicking ‘Import All’. The import functionality is smart and will not duplicate items when importing them from QuickBooks. So items that have already been imported will simply be updated.
EXPORTING WORK CODES TO QUICKBOOKS
The Work Codes in WorkSpace are mapped to the ‘Service Items’ in QuickBooks, and Expense Codes are mapped to the ‘Other Charge Items’. So when you push Work Codes and Expense Codes to QuickBooks, you can see your Item List (Lists -> Item List) growing in size from new Service and Other Charge Items being added.
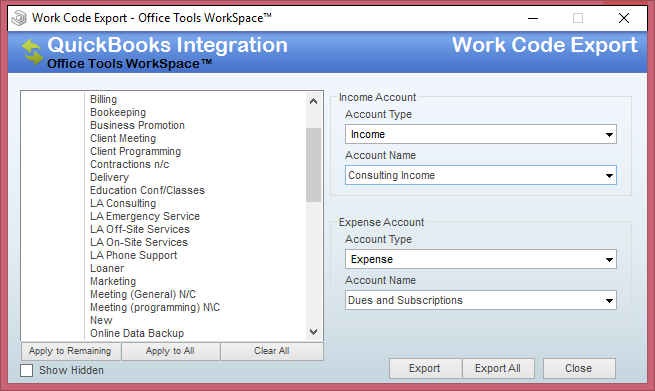
Service Items in QuickBooks require that they be associated to an ‘Income Account’. This ‘Income Account’ can be of the types Accounts Receivable, Bank, Income, or Other Income. You can optionally specify an ‘Expense Account’ that can be of the types ‘Account Payable, Bank, Cost of Goods Sold, Credit Card, Equity, Expense, Long Term Liability, Other Current Liability, or Other Expense. If most of your items have the same accounts, you can first setup the ones that have a different account manually, then choose one of the items that are left, choose the accounts for it, then use the ‘Apply to Remaining‘ button to quickly set all the rest of the items to the accounts you just selected. If all your items use the same accounts, you can simply set one up the click the ‘Apply to All‘ button.
Once you have chosen the accounts for all of your items, click the ‘Export All‘ button to begin the export process. You can monitor the process by going to QuickBooks and selecting Lists -> Item List from the Menu Bar, where you can now watch the Item List grow with each item that is exported.
MATCHING WORK CODES
If you already have data in both QuickBooks and WorkSpace, then you will most likely be using the Match form for the bulk of your initial data synchronization.
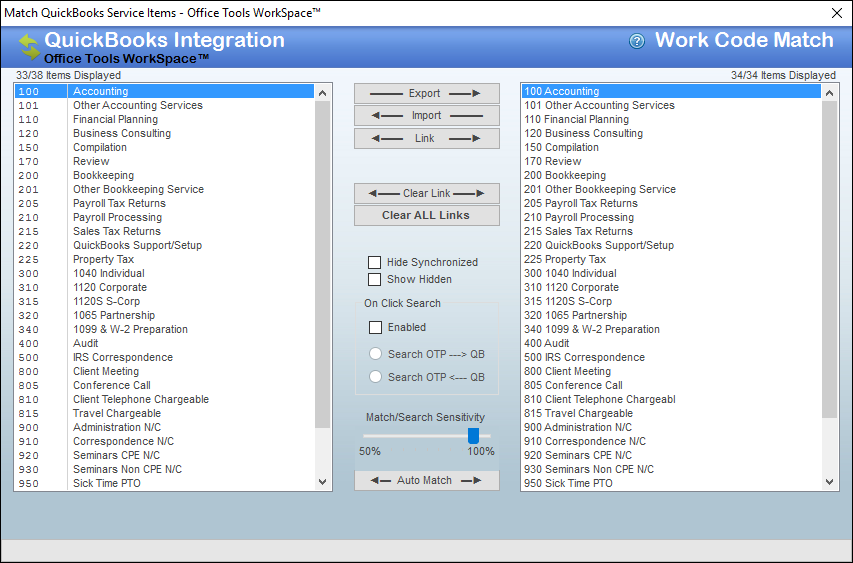
The Match Work Codes form has only two filters, ‘Hide Synchronized’ and ‘Show Hidden’. The ‘Show Hidden’ option forces the lists to include contacts that have been either ‘Hidden’ in WorkSpace, or set to ‘Inactive’ in QuickBooks. The ‘Hide Synchronized’ option filters the list to where it will only show items that have not yet been matched.
PLEASE NOTE: If there are no results for an item when the auto match runs, it will not link that contact to anything.
The Work Code Match form also has the ability to Import or Export items on a case-by-case basis. This functionality allows you to Import or Export items that were not found and linked by the Auto Match.