OVERVIEW
Within OfficeTools WorkSpace we have identified a need for firms to structure how staff are naming files to optimize the searching process later. Unfortunately, staff can sometimes be creative and make it difficult to standardize how your documents get named. This guide will explain how you can better organize your documents using predefined File Names.
USER GUIDE
Predefined File Names can help make sure your documents are being classified in a similar and standardized way anytime one is added into the WorkSpace software.
Please note, this option used within the WorkSpace interface, does not actually affect the real file name as it exists in Windows. To be clear if you ever discontinued the use of the software, the predefined File Names would not be available to you, so it is still important to properly name the documents.
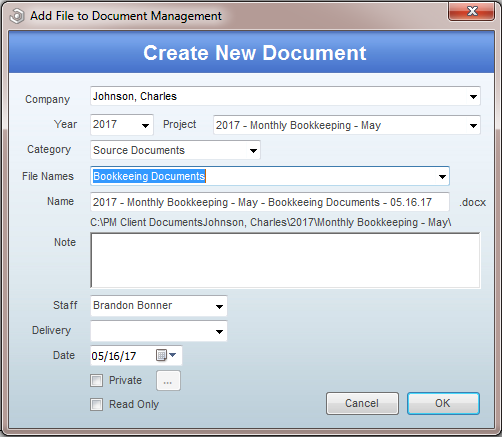
Whatever method that you use toad a document you will see two fields specifically, that affect the way that document will be named. File Names and Name. Name is the Windows file name that will be attached to that file and used to find and identify that document if you ever searched for that file in, say, Windows Explorer. You must have that to have a file in Windows at all.
The File Names field is something that is built in WorkSpace. You create different templates of how you would like the file to be labeled in the Document Management System.
If you go to SETUP>DOCUMENTS>FILE NAMES you will access your customized list of predefined file names. To add a new File Name, click Add.
In the File Names window that subsequently pops up, you will see three fields. The first field, File Name, is what you want to call this specific File Name template, so that when you are looking at your File Names list you know what each template is for.

The second and third fields are directly related. The Add Merge option will allow you to choose what type of information and in what order you want your File Name to be in. If you choose <<FilenameDesc>> for example, that will populate the template name into the label in WorkSpace. If you choose <<Project Year>> for example, it will insert the year from the project you associated to the document in the Create New Documents screen. The grey box right beneath the Add Merge option will show you the order you have put your merge fields in and effectively how your File Name will look on a file when used.
Please note that there is no way to edit the merge field list or format what those merge fields pull in. It is a set list and cannot be altered.
Once you have your list of File Names set, you can access them by importing a document. Dragging and dropping a document into the Documents tab will prompt you with the Create New Document screen and you will be able to choose various options to label your document for ease in future use. One of those fields will say “Name” and that is a custom area for you to fill in any file name you want from scratch.
The other option is the File Names which will be a drop down menu of all of your File Name templates. By choosing one you will nee the “Name” field update to the new file name based on the File Name template you chose.